Castiglione, 5th August 1796.
Re-fight 6th February 2011.
At “PAW 2011”
Using Grand Manouevre: Black Powder & Blue Steel Napoleonic Wargames Rules
The historical battle:
In conjunction with two other previously fought engagements, the battle of Castiglione-Solferino, was a victory for Napoleon; pushing Wurmser away and preventing the Austrians from relieving the siege of Mantua
Wurmser`s army, already defeated in detail, was outnumbered and out manoeuvred at this battle, but as Bill Peterson points out in his “virtual battlefields” article on the napoleon series, it had many of the key “Napoleonic” elements of battle; an early, limited, diversionary attack, a grand tactical flanking move by Sérurier’s Division, a massed battery of 18 guns against the redoubt of Monte Medolano, which anchored the Austrian left followed by an assault by Verdier`s grenadier battalions, and a final general attack on the enemy’s weakened left wing. This decisive action was largely carried out by Augereau`s corps and supported by Massena’s brigades.
This battle then, seemed like a good opportunity to show Napoleonic Grand Manoeuvre at work at the recent Plymouth Association of Wargamers` 2011 show.
Wurmser`s dispositions.
The Austrian general’s right wing, under the command of General Baron Paul Davidovich, rested upon the heights of the moraine in front of the village of Pozzo Catena
Although it might immediately look clumsy, this battle array makes sense because it protected the village of Solferino
Wurmser`s left was angled slightly outward from the lines formed by the right wing. This left wing included some of Davidovich`s units; Lipthay`s brigade and Gummer’s under the command of General-Major Baron Carl Philipp Sebottendorf. This wing was formed in one line that extended to the redoubt of Monte Medolano.
The Austrian cavalry of General Placzek; 4 divisions of the 2nd and 4th Hussars (each division being comprised of two squadrons), was interspersed between the intervals of the Austrian regiments. The second squadron of Meszaros Uhlans was positioned behind the Monte Medolano redoubt.
General Baron Anton Schübirz`s light division was stationed at Staffalo, and it guarded the right of Wurmser`s main position in front of Solferino.
French dispositions.
Augereau`s corps was the main force opposing Wurmser`s two wings. Its left resting on the foot of the hills at the small settlement of Grole. Massena`s Corps was on the other side of the hills, to the north east on flat ground at Barche di Castiglione. The Reserve under Marmont was behind Augereau`s right flank.
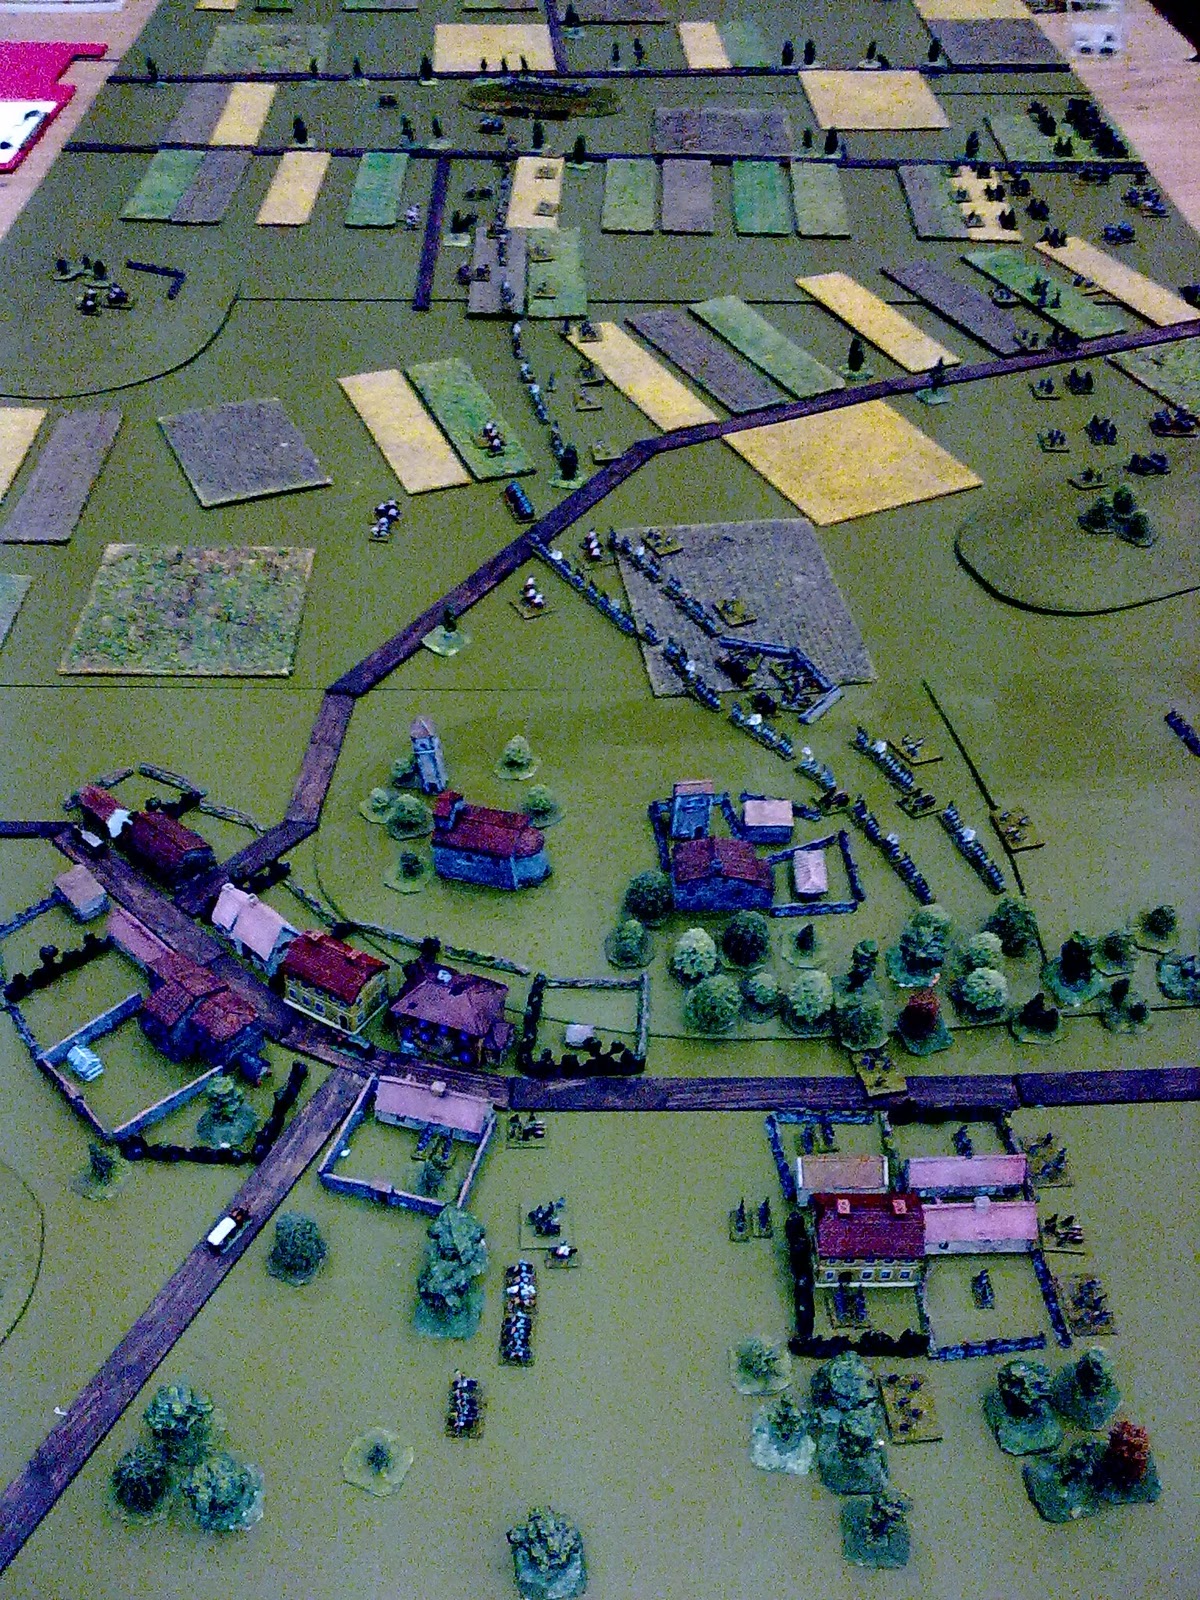
Photo: shows the battlefield with the Austrian dispostions from the villages of Solferino (left) and Staffalo (right) to the redoubt at Monte Medalano in the distance.
On the right/top of the photo, Augereau`s corps and the reserve is drawn up opposing the Austrian left.
The Re-fight:
French probing and pinning attacks:
The game began with Napoleon ordering Augereau to “probe” and engage the Austrian left and Massena to take the village of Staffalo
In turn, Augereau and Massena delegated these tasks to the brigades of Robert and Victor respectively.
Robert’s engagement with Gummer`s brigade was limited to skirmishing which was not decisive as the Austrian troops were of good quality.
After 40 minutes or so of skirmishing, realising that no impression or advantage was to be had, Robert disengages his brigade and pulls it back in to his original positions.
Victor`s assault on the north western end of Staffalo was more eventful however. After some initial stubborn resistance from the 1st and 2nd companies of Mahoney Jagers stationed there, the French columns finally took the end of the village. But their advance was halted by the Jagers who were now supported by 4 companies of Szluiner Grenz in the south eastern end of the village. Two companies of the Grenzers were held as a reserve behind the village.
When it became apparent that the attack had broken down, and the 2nd Battalion of the 11th Demi-Brigade`s morale was affected, Victor withdrew his brigade to regroup and possibly assault it again.
The French General Attack:
Realising that more force was required against the Austrian left, and unaware of events in Staffalo, Napoleon then sent orders to Marmont and Augereau.
Augereau was ordered to assault the Austrian centre left which was to Augereau`s front and Marmont was sent orders for the various parts of his reserve corps. The Austrian left redoubt was to be engaged in its flank by the reserve artillery and then assaulted by the combined grenadiers. And once the redoubt was secured, the cavalry of the reserve was ordered to make a movement upon San Cassiano, which was to the rear of the Austrian army to make a pursuit of the beaten enemy.
Augereau`s whole corps advanced slowly and steadily then to close with the Austrians, but their movement was limited by the fatigue that had been caused by a week of marching and counter-marching (from turn twenty in the game this fatigue effect had set in, reducing all the French movement rates).
As Augereau believed a fire-fight to be necessary, the first line of his corps array was deployed to line. With Robert’s brigade in two lines and Pelletier’s in one, only Robert’s supporting second line was in column formation.
From this point almost all goes well for Napoleon. The massed battery fire upon the flank of the Medolano redoubt slowly whittled away at the Austrian battery and once fully committed Augereau`s corps proved to be stronger than Lipthay`s and Gummer’s brigades.
Most decisive in this assault was the supporting fire from Augereau`s corps artillery which advanced to normal range and then created a gap in Lipthay`s line. This meant that for as long as this gap existed, Lipthay`s brigade were obliged to test their command reactions. Unfortunately, being arrayed in one single line, there was no immediate reserve available on the Austrian left, and once this had happened there was no time to remedy the situation.
Lipthay`s and Gummer’s brigades were tested twice until they finally broke.
The Austrians rout and Wurmser`s withdrawal:
Acting just in time however, Wurmser had ordered a withdrawal and for General Placzek`s cavalry to cover this retreat and also to fend off the movement of Beaumont’s cavalry which, after the potential danger from Medolano redoubt had been neutralised, was slowly making a wide flanking movement around the Austrian right.
By this time Leclerc`s and Despinoy`s brigades had arrived to add pressure to the withdrawal of the Austrian right.
We concluded the game by rolling for the two Austrian brigades to finally rally; Gummer`s brigade rallied first after three turns and Lipthay`s after five and so we judged that there was enough time for the Austrian infantry to escape without any threat of a pursuit and that the Austrian cavalry would have been able to cover this easily and respond to the advancing French cavalry on their left.
The Result:
A French win and this was never in doubt, but it was not a crushing victory.
Acting as Wurmser, I was fortunate in getting my army away in time. I was lucky that my left wing routed so far; it prevented the French from catching them in a pursuit!
I lost fourteen guns and of these, eight were twelve pounders. Two of my brigades had routed with four of my battalions` morale affected. The French had three battalions in poor morale, but this also includes one from Massena`s command attacking Staffalo.
Note:
Played on an 8x4 foot playing surface, this re-fight concentrated on the combats that decided the action. These were the combats between Augereau`s corps and Wurmser`s left, the reserve`s action on the Austrian extreme left and the arrival of Leclerc`s and Despinoy`s brigades and their advance across the heights towards Solferino. Therefore only a small part of Massena`s Corps was involved in the game.
Sounds an interesting game. Nice looking table. What have you used for the roads and rivers? I'm in the middle of a big terrain session for 15mm and 6mm and roads and fields are the current targets!
ReplyDeleteAndy
Thanks Andy
ReplyDeleteThe roads were 2mm card cut in to 20mm wide strips (a basee width) and painted a mix of burnt umber/burnt sienna/yellow ochre and a little white. These were cut to angles to approximate the course of the roads and these were then blue-tacked on to the table.
No rivers were shown on table, although there was one a little to the north of the hills.
If needed i guess one could do the same for rivers but maybe using the water colour of your choice.
Cheers Michael!
ReplyDeleteI think when I said rivers, I really meant fields! How are they done?
They were made by Bob`s Bits Wargrid about 12 years ago... not sure if he`s in production anymore... they are flocked cork tiles, which i think were primed brown... simple but effective... wish i had got some more. But I also have some with hedges too.
ReplyDelete